Sunday, April 28, 2013

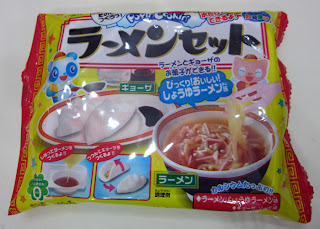
Popin' Cookin Ramen Set

Hey there, it's another Sunday!

Today we're taking a look at another one of Kracie's Popin' Cookin' items; the Ramen Set.
I cannot remember how much this kit was priced at but it's likely around the RM 14 mark as that's what the non-boxed sets tend to cost. It's no longer being produced, but you can still find it in some places if you're lucky. Kracie refreshes their product availability from time to time so in that sense you could say that everything is of a limited run per se.

This set basically lets you replicate one of the more staple dishes out in the east; namely Gyoza and Ramen. It may show an anthropomorphic pig on the front of the packaging but this product contains no meat. Just sayin'.
Tossing out the contents, we had one bag of instant soup, a bag of sprinkles, a log of moldable candy-stuff, a  bag of noodle mix, a plastic bag for making the noodles and finally a plastic fork.
In this kit the plastic packaging also doubles as a bowl and a plate for your noodles and gyoza, as well as having the usual cut-away water measuring cup and a mixing compartment.


Starting with the soup, you just had to measure in water to the line (approximately 3 scoops if memory serves me right) and dump in the mix. It smelled a lot like instant noodle soup, which was a nice change from all the extremely sweet candy kits we were more used to. A quick taste confirmed our suspicions, it did taste exactly like ramen soup! albeit a little saltier than normal.

Next up was the noodles. Since we hadn't yet learned the virtues of mixing squeezable materials in the bag yet, we simply did as the kit told us to. The resulting bright yellow mix was very thick and sticky. Using only the plastic fork given it was a challenge to get the entire thing into the little bag required to make the noodles. 
When in the bag, you have to nip off a tiny corner of it and squeeze it into the soup. I suspect there's something in there that makes it solidify, because the noodles did just that. Its up to you if you want to make a single string of noodle or nip it off after a certain length, really no real difference but the appearance of 
ramen was quite authentic.
 Now for the gyoza, or potstickers as they're called in some places.Basically you take out the log of candystuff and knead it out till its pliable.From there you're required to either roll or squash it till it gets to a general round shape. 
Sprinkle in some of the sprinkles (they kinda look like spring onion now that I think about it) and fold fold fold! There's about enough material to make about 3 gyozas in this manner.
As you can see, mine didn't go too well because uh, maybe I'm not Asian enough to innately know how to magic up gyozas without being taught how.
Silvy on the other hand, did it like a natural! Look at how pretty it is.
When done you can place the three into the compartment next to the ramen 'bowl' and chow down!

Here's some closeups.

The noodles and soup actually tasted like real noodles and soup which was quite surprising for us. The soup was flavoured like instant noodle soup (aka soysauce-ish flavoured) while the noodles did taste quite real too. If there was ever an adult sized version of this thing, I'd buy it!

I didn't really like the gyoza though. The sudden sweet contrast just didn't do it for me. The sprinkles were crunchy and sweet, while the candy itself was soft and sweet but yeah, I liked the ramen way more.

Spire sez: The gyoza was just meh for me, but boy did I love the ramen! Actually folding up the gyoza was a little tough (maybe just for me because, big ungainly hands) but overall it's a pretty easy kit by itself. Now if they the same technology for regular sized instant noodles...

Silvy says: The ramen was positively delish!! It was a truly savoury, if not miniature, dish.  The gyoza was pretty good, but only if you're into sweet gyoza I suppose. It had somewhat put me off cause after the savoury ramen, I would have loved to have a savoury gyoza too!

Spire's Ratings
Flavor: 3/5
Price: 4/5
DIY level: Easy
Fun: Yes!

Silvy's Ratings
Flavor: 4/5
Price: 4/5
DIY level: Easy Peasy
Fun:  5/5
Tuesday, April 23, 2013

Lotte Funzels (Chocolate)

Hey there! I don't usually review pocky or pocky look-alikes, but I think this one deserves it's own posting. 
I got this one at Cold Storage for RM 3.95, pretty cheap all things considered. Produced by Lotte, these pocky sticks feature a dipping of chocolate over a rather crunchy stick, which is typical for pocky type stuff. 

I did a quick taste comparison with the local variant of Glico's every popular pocky; Rocky (don't ask, its been named that as long as I can remember) and I find Funzels taste better in comparison. They're a wee bit thicker and the chocolate doesn't taste horribly cheap. The pretzel-sticks are also a tad bit saltier and since I like savoury stuff I found the combo quite enjoyable. I'm not sure if Funzels are easily found in most of the local supermarkets but I'd give it a go if you found some. All pocky aren't created equal ;)

Spire sez: I'm not sure if Funzels are easily found in most of the local supermarkets but I'd give it a go if you found some. All pocky certainly aren't created equal ;)

Spire's Ratings
Flavor: 4/5
Price: 5/5
DIY level: Nonexistant
Fun:  Nonexistant

Sunday, April 21, 2013

Kracie Happy Kitchen Cupcakes

Heya guys, it's another week, so it's time for another candy review.This time we're looking at one of Kracie's DIY microwaveable candy kits; Cupcakes!
Unlike Kracie's Popin' Cookin line of DIY stuff, their Happy Kitchen kits are a little more complicated as they require microwaving to create the treats. If I'm right this kit cost RM 15.90, and it can sometimes be found at Isetan but I generally saw a lot of them at Shojikiya during it's run, it's unfortunately been discontinued but there's still some floating around in the market.
There's a fair bit of stuff in the box in this one. You get two icing bags, two sachets of 'mix' in both vanilla and chocolate flavour, the usual strawberry and vanilla cream, a bag of candy decorations that are milk flavoured and plum flavoured. You get a generic sachet of sprinkles too.
You'll be doing your baking using the three cute molds included in the kit. We have to chop up the entire plastic construction as usual and it falls into four compartments; the measuring 'spoon' which is their standard triangle shaped thing, the molds, one compartment to stir up your mix and the last compartment for the icing creams.
Just pour in either the vanilla or chocolate mix and fill in the required amount of water as indicated by the box.The resulting batters did smell fairly sweet, especially the vanilla. They were a little thick (and hard to pour out) so I ended up adding a little bit extra water so it flowed slightly better.I washed out the mixing compartment between flavours but you could also mix the two to make a cute swirly design as well.

When that's done just pour it into the molds and off they go into the microwave! depending on your micro's wattage, the cooking times are slightly different but it's between 20-30 seconds. I just watched it just in case.
The cupcakes rose in the microwave fairly quickly, and after letting it cool down for a short while they turned out very nice and fluffy. The smell was pretty nice too, a rather gentle sweetness.
Unfortunately I neglected to clear out the mold inbetween cupcakes so the chocolate ones came out pretty bad due to sticking to it. They might come of better if you oil the moulds very slightly (like with one tiny drop of oil and spreading it) before baking they will likely be easier to remove as well. I just cut off a little section of the malformed chocolate ones and shaped it a little so it looked nicer.
Now came the icing cream. Most of the time the instructions require you to mix it in the respective container and then scoop it into the icing bag, which is a terribly messy and wasteful thing to do in my opinion because I'm a massive fail and can never get all of it out properly. So in favour of trying to be more efficient, I simply poured in the powder and water directly into the bag and mixed it in there.This works just as well as long as you make sure you mix it really well.
You can also put the vanilla into a second icing bag but I wanted to spread it so I used the thing properly as it was intended. These are the usual stock icings that Kracie uses in a lot of kits so the taste wasn't exactly fantastic in any way (in my opinion) but they were fairly sweet.
Decorating went quite fast with the included spoon and icing bag though I decided to forgo the plum flavoured candies completely; they tasted rather bizarre to me.The milky candies tasted quite alright; but they're not something I'd eat all the time; they taste funny after awhile.

The cupcakes themselves were very nice. They were soft and spongey and generally tasted like very light versions of regular vanilla and chocolate cupcakes. The icings were, as expected rather mediocre.

Spire sez: Of the many kits by Kracie I've tried, this one I would categorize as one of the light ones in terms of it's simplicity. The end result on the other hand isn't really all that special but it was still quite fun decorating up the bite sized cupcakes. Also, who puts plum candies in with creamy tasting stuff? maybe it's a Japanese thing but I didn't find them very nice at all.Perhaps if they had included proper chocolate syrup or something else besides their stock vanilla and strawberry icings I'd give them more for their flavour score. Girls will like this kit a lot nonetheless.

Spire's Ratings
Flavor: 3/5
Price: 3/5
DIY level: Easy
Fun: 4/5

Saturday, April 13, 2013

Popin' Cookin' Oekaki Gummy Land

Hey guys, we're back with another sweet review (pun intended!)

This set was gotten from Tokutokuya for RM 13.90. You can get it in some other places as well but I haven't seen any besides there.
Generally what you do with this set is you make your own flavoured candy gummies with the provided materials in box; which consists of a bunch of cookie cutter shapes that varies from pack to pack, there's no way of telling exactly what's inside, a few sachets of gummy powder and flavourings as well as a 'pallet' of sorts where you make your creations.
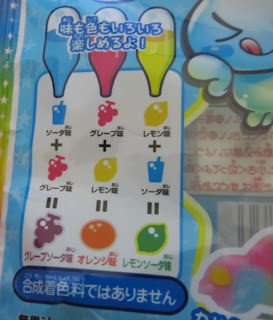
You pretty much achieve this by using the included dropper to 'colour' the shapes with the flavoured water. There's some instructions in the front on what colours end up tasting like what flavours, but its still totally up to you whether you want to follow it or not. 
Even if you can't read Japanese they make it really easy to understand what sorts of flavours you get when you mix the colours. You can apparently make diluted versions of each colour as well, by adding a higher water ratio in the pallet; but I find that it dilutes the flavours a little too much to my liking.
Inside, you get the usual bundle of sachets, a plastic pallet, cookie cutter shapes and a dropper.
Its a shame that its not too easy to see what shapes you will get inside. I think I landed with one of the more generic-shapes ones. I was hoping that there would actually be a dolphin shape inside (as indicated by the packaging) but I guess this will have to do. The plastic is fairly tough, so once you're done you can keep them as cookie cutters or stuff to make those cute bento box decorations.
All laid out, you pour in the whole packet of sweet smelling gummy powder into the largest section of the pallet, and fill up the appropriate colours. Each reservoir has a water level indicator so you likely won't overfill it by accident. Yellow is lemon flavoured, red is grape flavoured and blue is ramune/soda flavoured. Of the three primary colours I liked the yellow the most; it tasted strong without being ridiculous, which is a good thing!
I decided to go with one of the smaller shapes first, and followed the instructions to get the appropriate colours; except for the brown (a mix of all three primary colours) which kinda tasted like a watered down cola. You have to shove the shape all the way down till the powder is almost overflowing out of it before you get to work.
Colouring up the shapes is pretty easy; you grab the dropper and drip in the colours you want to 'paint' the gummy with.
Once the colour is in, it's sucked up by the powder so even if you put more on the same spot it doesn't mix, so you can get creative without worrying that it'll turn into an ugly mess. Pretty neat!
After that you give the gummy a short while to dry and you can just pick it out of the mold using the included fork. The back of the gummy will be coated in a little bit of white powder where the liquid didn't get through and will be a bit lumpy. You can take care of it with a quick squirt of extra colour before you put it aside.Then use the fork to even out the powder again before you make a new gummy.
Now the biggest problem I have with the kit here is overflow. When you start getting near the bottom of the powder, the gummy tends to either get stuck to the bottom of the pallet or extra colour starts coming out the sides.

The kit is maybe good for maybe four gummies before it hits this stage, depending on which shapes you used. In the end there was a little powder left over which I couldn't do much with so I squirted it with some colour and let it solidify there. A gummy's a gummy.
Personally I found this kit quite enjoyable. For starters the colours are nice and vibrant; and the flavours are quite pleasant as well. They weren't horribly sweet and neither were they too strong.

The only flavour I didn't really like was the Ramune, but that's mainly because I don't like Japanese Soda flavour to begin with. The rest tasted quite strong, with my favourites being lime and orange.

The gummies themselves weren't as tough as the ones you can get at the store, but instead were slightly soft, but they held their shapes well and frankly they were delicious.

Spire sez: Honestly speaking, this would be one of the kits I would love to play around with again. Its fun for kids who are creative, and it's real colourful so it satisfies the need to learn-and-play. The gummies are pretty tasty too; I just wish they gave more of the gummy powder; I'd gladly pay extra if they provided maybe two sachets instead of just one. On top of that the pallet can be kept for real watercolour works and the shapes can be kept as well, I say this kit deserves it's high ratings.

Silvy says: It was a fun and entertaining kit! My only peeve would be that the instructions were pretty vague (if you didn't search it up on Youtube that is) and the gummies didn't dry up fast enough for me to remove them from the molds! Oddly hypnotizing and relaxing to work this out, have a great time with your friends (and get sugar high right after that!)

Spire's Ratings
Flavor: 4/5
Price: 3/5
DIY level: Easy
Fun:  5/5

Silvy's Ratings
Flavor: 5/5
Price: 3/5
DIY level: Easy to Average

Fun:  5/5