Tuesday, October 15, 2013

Tokyo Banana

Hi again! It's been a long while since we had a posting ;) that's because Spire went to Japan and brought back a whole bunch of goodies that you'll soon see here, so lets get the ball rolling!
This here is Tokyo Banana, a speciality treat from Japan, Tokyo. Generally it resembles a banana (hence the name) and is a spongy confection that has banana creme filling inside. At first glance it's best described as a twinkie with banana in it! Before visiting Japan, I practically got swamped with people asking me to bring this stuff back. It's apparently *that* legendary.

They generally come in packages of 470 yen, 1000 yen and a bigger one at 1500 yen, with 4, 8 and 12 pieces respectively. The price is slightly different depending on the flavour, I got the classic one so it was the cheapest.

The stuff is practically sold everywhere touristy, you can get it at train stations in Tokyo and there's a variety of flavours and designs featuring leopard spots, tiger stripes and giraffe spots with each 'design' having it's own distinctive flavour. I wasn't able to try all the different flavours but they go like this: tiger stripes were caramel flavoured, giraffe was banana pudding, leopard is chocolate. The company makes a whole slew of tasty treats (mostly banana themed!) you can check them out here.
Sure enough, it was delicately spongy and roughly banana shaped. It did smell nice and rather banana-ish too; I'd describe the entire experience as gently banana, if that made any sense. Time to take a bite!
Mmph. That was delicious. The spongecake was very soft and fluffy, and the inner creme had the consistency and texture of banana mixed with custard. Not too sweet but distinct, I think I'm insulting Tokyo banana by comparing it to twinkies.

Spire sez: I.cannot.get.enough.of.the.stuff. If you go to Japan, this is a must try, even if you don't like sweets. Seriously, it's a right shame if you don't.. My only complaint: dammit I should have bought a bigger box =_=;

Silvy says: First of all, THANK YOU SPIRE FOR THE TOKYO BANANAS!! ^____^v Being extremely particular about the sweets that I consume, I am totally in love with Tokyo Bananas! The sweetness of the banana is not compromised by a truckload of sugar, which is probably the reason why I adore this dessert (I go bananas over bananas). Try it if you can! :D

Spire's Ratings
Flavor: 5/5
Price: 4/5
DIY level: Nonexistant
Fun: Damn that's tasty

Silvy's Ratings
Flavor: 5/5
Price: 3/5
DIY level: Nonexistant
Fun: OMNOMNOMNOM

Saturday, September 28, 2013

Coris Wakuwaku Doubutsu Soft Animal Candy

I wasn't entirely sure what these were at a glance, based on the packaging alone I thought these were some kind of chilled candies. But no, they're actually soft candy lollies which looks like one of those Kutsuwa eraser kits gone wrong. I got it for RM 7.70 at Isetan KLCC. Their selection has gotten very good as of late so I strongly recommend looking around there if you want to try out any of their Japanese candies.
The flavours that you're given are pretty apparent from the packaging; strawberry and lemon. And this is one of those kits where the contents are blind packed too. The wrapper shows a panda and a lion, but I got a bunny and an elephant instead.
There are four different molds you can possibly draw, with the giraffe and bear looking like the cutest.
Inside you'll get the pair of aforementioned press-molds, the soft candy and four lollipop sticks to use.

On opening the candy I was hit by some great smells. The candy is soft and the lemon smells tangy while the strawberry smelled a bit sweet but not too artificial. It was looking great so far. How it works is you have to pluck off the desired bits of soft candy and press them into different sections of the press, since both flavours go pretty well together it doesn't matter where you place them either.
When you're satisfied with the placement of things, stick the stick in the middle and press it down as far as it'll go. Pop it off and what you get? adorably cute lollies!
The candy itself is soft and easy to manipulate, though it gets sticky if you handle it for too long. You've got enough material to make 4 sticks worth but I somehow ended up with extra. The molds are a breeze to use too, nothing got stuck! which is pretty neat in itself because mold kits tend to tell you to either spray the molds with water or oil them.
Spire sez: This is definitely a fun kit that's meant to be shared. They even give a little extra candy so there's room for error. The candy is not too sweet, its just right in my opinion. Both the lemon and strawberry taste true to their flavours without artificialness, though I also find the kit requires crazy levels of manual dexterity to get candy into the tiny parts of the mold else the candies can end up looking pretty creepy with holes and stuff. Overall I think it'll be a hit with slightly  older kids.

Spire's Ratings
Flavor: 4/5
Price: 5/5
DIY level:  Easy
Fun: 3/5

Wednesday, August 21, 2013

Kracie Naru Naru Gumi Candy Kit (Soda)

Hey everyone, we're back after another (very busy) hiatus :D

Just a note, I went to Isetan KLCC recently and they've stocked up with an entire shelf full of new candy kits (price range RM 7-RM19) so here's your chance to bag yourself some!

What we have here is a very simple yet popular candy kit that allows you to make your own gummy 'grapes' in a rather unique way. I got this for RM9.90. I think it was a promo price because I've seen it being sold for RM12 elsewere before. I got it at one of those Japan snack faires. There's a grape flavour too, which I imagine would have been sweeter than the soda one.
Inside the bag you have the makings of a grape 'stem' made of plastic as well as three bags of sugary substance, namely a bag of fizzy sprinkles, a bag of the gummy powder and one more bag of powder you mix into a liquid to dip the 'stem' into.
How this works is you assemble the stem after cutting them out of the lattice (that tree shaped thing) and repeatedly dip it into the liquid, into the powder and then back into the liquid to build up the 'grapes' as you go along. It pretty much looks like this once assembled. It fits in a wee bit loose so make sure you snap it all in as tight as you can.

If you're not entirely sure how it fits together, there's some very easy to understand instructions on the back of the packet.
The kit is pretty straightforward. After you piece the stem together just pour in packet number 1 into compartment 1 and fill it up to the water line. This pack had a very strong ramune smell when I opened it up. Stir it till it dissolves and you're good to go to package 2!

Package 2 simply goes into the next compartment. It kinda looked like soap powder out of the bag, but it distinctively smelled of ramune too.
Just stick the stem in compartment one, rotate once and you're ready to start!
You just keep going back and forth between the powder and the liquid and watch as 'grapes' start to form on the stem. Our advice to get the most out of your powder is to even it out once grooves start to form so you get more even coverage.
 You'll eventually end up with this (or bigger!)
The last package has a bunch of fizzy sour lemon sprinkles in it that happilly fizz away when they hit the grapes. Personally I don't like the sprinkles all that much but they're quite nice to look at.

As far as taste goes, I was a bit surprised it didn't taste AS strong as I expected. The grapes have a gooey gummy texture of sorts and they aren't too sweet. If you made them too large they do have a tendency of randomly dropping off but generally speaking there's enough material in the packets to make almost two full stems worth of 'grapes'.


Spire sez: It was relatively fun though I probably wouldn't eat it again on pretext of not really enjoying the texture and flavour all that much.Overall this kit's end result wasn't too impressive and it can turn into a giant mess but it'll keep the kiddles entertained while you untangle the confusion about how grapes really are made :P

Spire's Ratings
Flavor: 3/5
Price: 3/5
DIY level: Easy
Fun: 4/5

Monday, May 20, 2013

Popin' Cookin' Bento Candy Kit

Hey everyone! I hope your week has been awesome because we have another  post!
This kit is one of the more popular ones, having had a lot of reviews and videos done of it over time. It's still available on the market (yay!) but the kit has had a refresher (aka a change in packaging and contents) but it hasn't had a drastic change, with the exception of it having an additional bag of sprinkles and it no longer features the chicken nuggets. This one I bought for RM16.90 at Shojikiya, and it's still priced about the same for the new kit.

The inner packaging when opened out, had a surface for you to put your ready made bento on; with an illustration of a lunch box you could arrange it all on. The sides had the usual size guides and instructions on how to make the rice balls and how to operate the noodle mix bag. If you're going to use this as a plate or display, we do stress that you should at least give it a rinse first.
Inside, there's the usual plastic mold with all the bento 'food' shapes and mixing compartments. You get a little plastic fork as well and the dreaded plastic bag, on top of the six bags of mix that will create the goodies within.
Just pour the appropriate powders into each compartment and add the necessary amount of water as indicated by the instructions, then stir it with the fork. The liquid has quite the tendency to overflow so if you're a stickler for perfection I suppose you could mix it elsewhere and pour it into the mold instead. The octopus sausage mold made the most spectacular mess when we were getting it done because the tentacles were rather shallow.
While waiting for it all to solidify, we started on the other components.

The rice as expected was quite nice and fluffy when we mixed it up. It's important to follow the instructions when it comes to the water for this one; even the slightest extra will cause it to be goopy and very un-ricelike but too little will make it fail to congeal.
That done, we used the instructions on the inner packaging to make our panda riceballs and onigiri! After shaping it all, we pressed the larger riceball into the black powder molds to create a cute panda face, pressing the triangle in to make an onigiri and rolling the other two smaller balls to make the panda's 'ears'.

The powder was a little sour but had a bit of fizz to it. We ended up licking our fingers a lot! It stuck to the rice very well but there's was a lot leftover too. After that I just mixed up the chicken nuggets powder. It started off a bit gooey like the rice mix but congealed together in the end. 
Once done, we molded the chicken nuggets. They're a little more dense than the rice mix but they sure looked good. Separate the mix into two nuggets and press it each side with the fork to give it the 'katsu' look and you're good!
Next up was the pasta. Not to be defeated by the 'noodle goo' once again, we poured it right into the bag and mixed it there. Just make sure that there aren't any lumps and you're done.That said, simply nip off a corner of the bag and squeeze out the mix to make the 'spaghetti'. You can control how thick you want your pasta too, but thicker is better in this case.

By then the broccoli, egg roll and sausage had solidified nicely. They were all a little jiggly (it's jelly after all!) but weren't hard to remove from their molds. We then folded up the egg roll and it glued itself together easily before placing it all onto the plate.
I neglected to dry the plate before taking photos, so it's a little wet because the gummies had a little bit of dripping liquid when we took them out. I suppose if you left them in longer, they'd be a lot more dry unlike what you see here.

On to the tasting!

The spaghetti had a yogurty-starchy taste. It wasn't bad but at the same time not entirely flavourful either.

The egg roll tasted like grape. A bit strange coming from something yellow in colour but its likely it's white grape (muscat) flavour.

The rice tasted very plain but the slightly fizzy and sourish powder gave it a bit of a tingly kick. Otherwise the rice was just really fluffy and starchy.

I liked the chicken nugget thing a lot! I can't entirely remember what it tasted like but it was kinda yogurty I suppose.

The broccoli also tasted like grape(muscat) and the octopus sausage like strawberry. It's meant to be one of those really sweet kits so nothing here is actually savoury.

Spire sez: Well overall I'd say the kit was quite fun but I wasn't too big a fan of the flavours.. I felt they weren't strong enough and their choices of flavours were a bit out there (but a standard for Japanese candies) perhaps I am more biased towards the Happy Kitchen sets that actually put in more solid ingredients but I suppose that's just me.

If you like making a big mess and like eating the sweet aftermath, I say this kit is one of the 'must try' DIY items.

You could also probably wash out the mold and keep it for future projects using Jello I wager.


Spire's Ratings
Flavor: 4/5
Price: 3/5
DIY level: Easy
Fun: 3/5

Sunday, April 28, 2013

Popin' Cookin Ramen Set

Hey there, it's another Sunday!

Today we're taking a look at another one of Kracie's Popin' Cookin' items; the Ramen Set.
I cannot remember how much this kit was priced at but it's likely around the RM 14 mark as that's what the non-boxed sets tend to cost. It's no longer being produced, but you can still find it in some places if you're lucky. Kracie refreshes their product availability from time to time so in that sense you could say that everything is of a limited run per se.

This set basically lets you replicate one of the more staple dishes out in the east; namely Gyoza and Ramen. It may show an anthropomorphic pig on the front of the packaging but this product contains no meat. Just sayin'.
Tossing out the contents, we had one bag of instant soup, a bag of sprinkles, a log of moldable candy-stuff, a  bag of noodle mix, a plastic bag for making the noodles and finally a plastic fork.
In this kit the plastic packaging also doubles as a bowl and a plate for your noodles and gyoza, as well as having the usual cut-away water measuring cup and a mixing compartment.


Starting with the soup, you just had to measure in water to the line (approximately 3 scoops if memory serves me right) and dump in the mix. It smelled a lot like instant noodle soup, which was a nice change from all the extremely sweet candy kits we were more used to. A quick taste confirmed our suspicions, it did taste exactly like ramen soup! albeit a little saltier than normal.

Next up was the noodles. Since we hadn't yet learned the virtues of mixing squeezable materials in the bag yet, we simply did as the kit told us to. The resulting bright yellow mix was very thick and sticky. Using only the plastic fork given it was a challenge to get the entire thing into the little bag required to make the noodles. 
When in the bag, you have to nip off a tiny corner of it and squeeze it into the soup. I suspect there's something in there that makes it solidify, because the noodles did just that. Its up to you if you want to make a single string of noodle or nip it off after a certain length, really no real difference but the appearance of 
ramen was quite authentic.
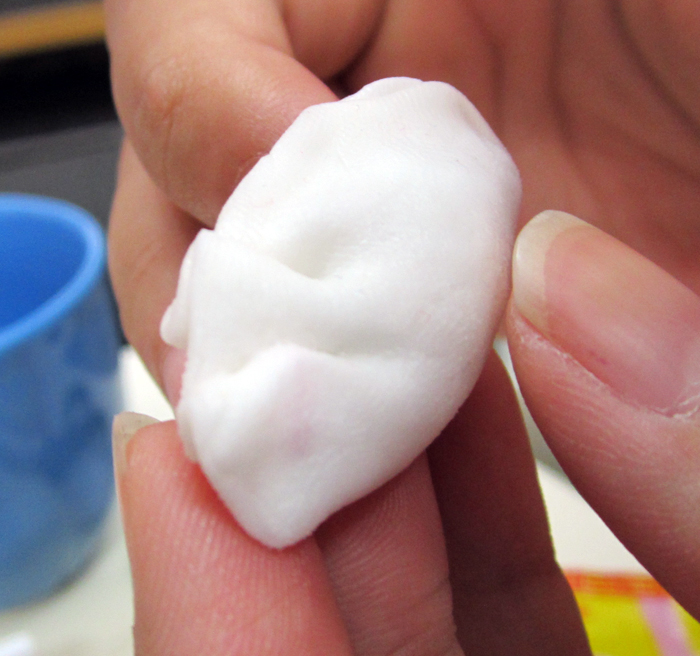
 Now for the gyoza, or potstickers as they're called in some places.Basically you take out the log of candystuff and knead it out till its pliable.From there you're required to either roll or squash it till it gets to a general round shape. 
Sprinkle in some of the sprinkles (they kinda look like spring onion now that I think about it) and fold fold fold! There's about enough material to make about 3 gyozas in this manner.
As you can see, mine didn't go too well because uh, maybe I'm not Asian enough to innately know how to magic up gyozas without being taught how.
Silvy on the other hand, did it like a natural! Look at how pretty it is.
When done you can place the three into the compartment next to the ramen 'bowl' and chow down!

Here's some closeups.

The noodles and soup actually tasted like real noodles and soup which was quite surprising for us. The soup was flavoured like instant noodle soup (aka soysauce-ish flavoured) while the noodles did taste quite real too. If there was ever an adult sized version of this thing, I'd buy it!

I didn't really like the gyoza though. The sudden sweet contrast just didn't do it for me. The sprinkles were crunchy and sweet, while the candy itself was soft and sweet but yeah, I liked the ramen way more.

Spire sez: The gyoza was just meh for me, but boy did I love the ramen! Actually folding up the gyoza was a little tough (maybe just for me because, big ungainly hands) but overall it's a pretty easy kit by itself. Now if they the same technology for regular sized instant noodles...

Silvy says: The ramen was positively delish!! It was a truly savoury, if not miniature, dish.  The gyoza was pretty good, but only if you're into sweet gyoza I suppose. It had somewhat put me off cause after the savoury ramen, I would have loved to have a savoury gyoza too!

Spire's Ratings
Flavor: 3/5
Price: 4/5
DIY level: Easy
Fun: Yes!

Silvy's Ratings
Flavor: 4/5
Price: 4/5
DIY level: Easy Peasy
Fun:  5/5

Tuesday, April 23, 2013

Lotte Funzels (Chocolate)

Hey there! I don't usually review pocky or pocky look-alikes, but I think this one deserves it's own posting. 
I got this one at Cold Storage for RM 3.95, pretty cheap all things considered. Produced by Lotte, these pocky sticks feature a dipping of chocolate over a rather crunchy stick, which is typical for pocky type stuff. 

I did a quick taste comparison with the local variant of Glico's every popular pocky; Rocky (don't ask, its been named that as long as I can remember) and I find Funzels taste better in comparison. They're a wee bit thicker and the chocolate doesn't taste horribly cheap. The pretzel-sticks are also a tad bit saltier and since I like savoury stuff I found the combo quite enjoyable. I'm not sure if Funzels are easily found in most of the local supermarkets but I'd give it a go if you found some. All pocky aren't created equal ;)

Spire sez: I'm not sure if Funzels are easily found in most of the local supermarkets but I'd give it a go if you found some. All pocky certainly aren't created equal ;)

Spire's Ratings
Flavor: 4/5
Price: 5/5
DIY level: Nonexistant
Fun:  Nonexistant

Sunday, April 21, 2013

Kracie Happy Kitchen Cupcakes

Heya guys, it's another week, so it's time for another candy review.This time we're looking at one of Kracie's DIY microwaveable candy kits; Cupcakes!
Unlike Kracie's Popin' Cookin line of DIY stuff, their Happy Kitchen kits are a little more complicated as they require microwaving to create the treats. If I'm right this kit cost RM 15.90, and it can sometimes be found at Isetan but I generally saw a lot of them at Shojikiya during it's run, it's unfortunately been discontinued but there's still some floating around in the market.
There's a fair bit of stuff in the box in this one. You get two icing bags, two sachets of 'mix' in both vanilla and chocolate flavour, the usual strawberry and vanilla cream, a bag of candy decorations that are milk flavoured and plum flavoured. You get a generic sachet of sprinkles too.
You'll be doing your baking using the three cute molds included in the kit. We have to chop up the entire plastic construction as usual and it falls into four compartments; the measuring 'spoon' which is their standard triangle shaped thing, the molds, one compartment to stir up your mix and the last compartment for the icing creams.
Just pour in either the vanilla or chocolate mix and fill in the required amount of water as indicated by the box.The resulting batters did smell fairly sweet, especially the vanilla. They were a little thick (and hard to pour out) so I ended up adding a little bit extra water so it flowed slightly better.I washed out the mixing compartment between flavours but you could also mix the two to make a cute swirly design as well.

When that's done just pour it into the molds and off they go into the microwave! depending on your micro's wattage, the cooking times are slightly different but it's between 20-30 seconds. I just watched it just in case.
The cupcakes rose in the microwave fairly quickly, and after letting it cool down for a short while they turned out very nice and fluffy. The smell was pretty nice too, a rather gentle sweetness.
Unfortunately I neglected to clear out the mold inbetween cupcakes so the chocolate ones came out pretty bad due to sticking to it. They might come of better if you oil the moulds very slightly (like with one tiny drop of oil and spreading it) before baking they will likely be easier to remove as well. I just cut off a little section of the malformed chocolate ones and shaped it a little so it looked nicer.
Now came the icing cream. Most of the time the instructions require you to mix it in the respective container and then scoop it into the icing bag, which is a terribly messy and wasteful thing to do in my opinion because I'm a massive fail and can never get all of it out properly. So in favour of trying to be more efficient, I simply poured in the powder and water directly into the bag and mixed it in there.This works just as well as long as you make sure you mix it really well.
You can also put the vanilla into a second icing bag but I wanted to spread it so I used the thing properly as it was intended. These are the usual stock icings that Kracie uses in a lot of kits so the taste wasn't exactly fantastic in any way (in my opinion) but they were fairly sweet.
Decorating went quite fast with the included spoon and icing bag though I decided to forgo the plum flavoured candies completely; they tasted rather bizarre to me.The milky candies tasted quite alright; but they're not something I'd eat all the time; they taste funny after awhile.

The cupcakes themselves were very nice. They were soft and spongey and generally tasted like very light versions of regular vanilla and chocolate cupcakes. The icings were, as expected rather mediocre.

Spire sez: Of the many kits by Kracie I've tried, this one I would categorize as one of the light ones in terms of it's simplicity. The end result on the other hand isn't really all that special but it was still quite fun decorating up the bite sized cupcakes. Also, who puts plum candies in with creamy tasting stuff? maybe it's a Japanese thing but I didn't find them very nice at all.Perhaps if they had included proper chocolate syrup or something else besides their stock vanilla and strawberry icings I'd give them more for their flavour score. Girls will like this kit a lot nonetheless.

Spire's Ratings
Flavor: 3/5
Price: 3/5
DIY level: Easy
Fun: 4/5