Showing posts with label sweet candy. Show all posts

Monday, July 7, 2014

Crispy Mint M&Ms

Hi again!

Since it's now Summertime lets talk about another summer treat I got from Japan when I last visited. 

Mint treats are quite a hit during the summer time, with lots of different candies and treats featuring mint and their other cooling derivative flavours. I can't entirely remember the price but it's somewhere between 100-200 yen.
Of course you can find these year around in some countries, but I've yet to find this combination around here and that makes me sad. Because I love any and all things mint. But I have been seeing more M&M flavours pop up around these parts so maybe we will actually get some mint flavoured ones eventually ;)

The M&Ms themselves look like your bog standard crispy M&Ms, significantly larger than the regular chocolate ones and comes in shades of white, dark and light green. These unfortunately cracked because we're experiencing a heat wave and my candy took a bit of damage =\
They're nice and crunchy (but not like a malteaser, those are much tougher) but with a strong cool mint flavour from the moment it hits your tongue. The crisp is very slightly salty, the middle of it is green.

The chocolate however is not unlike what you get in a regular M&M, though they taste less sweet. The cooling effect is restricted to mainly the shell alone so it doesn't permeate the entire candy.

Spire sezIt's a cool candy (pun intended) which I wouldn't mind getting again (imagine it as an ice cream topping!) but I've yet to see it a 2nd time.
Spire's Ratings
Flavor: 4/5
Price: 4/5
DIY level: Nonexistant
Fun: Damn that's tasty!

Sunday, January 12, 2014

KitKat Blueberry Cheesecake

Of all the loot I brought back from Japan, this one was probably the most oddly shaped thing I had to cram in my suitcase. I've always heard of 'strange KitKat flavours' being available in Japan so I decided to hunt about Narita airport a bit before my flight for anything of interest. This one certainly caught my eye. From what I found out is each prefecture in Japan has it's own unique flavour, ranging from the more benign Strawberry and Blueberry Cheesecake flavours as well as the ever popular Green Tea (Macha) flavour to scarier ones like Soy Sauce (Shoyu) and Wasabi.

For the whole box I think it was priced at 820 yen (about RM 25, ouch!). I may not be remembering exactly but these are generally sold around the 800 yen price bracket. The box which was shaped like a towering Mount Fuji held 9 pieces inside,  in a ball of clear plastic. 

The individual pieces themselves are heavily stylised with Mount Fuji and an image of it's indicated flavour in the front as well as a cute nameplate at the back which you can write on if it's meant as a gift. 
Sorry for the drop in picture quality. My camera died halfway and I had to resort to using my phone's horrible camera.

Out of the wrapper, it's pretty apparent that these special KitKats are a lot smaller than their bog standard chocolate brothers.

Regardless, they still look like KitKat and features their logo emblazoned on the top. It's not very visible because I think the Malaysian heat melted them a little in transit.

As far as flavour is concerned, it's white chocolate and exceptionally creamy, a little cheesy-milky with a hint of sweet blueberry as you chomp into the wafer. Its not too sweet but it's fairly rich so I couldn't handle too many at a go. Maybe that's why they're packaged so teeny?
Spire sez: I'm not a huge fan of large quantities of white chocolate but it's a nice change if you're tired of regular ol' KitKat or are just feeling adventurous. Most of the people I gave this to absolutely loved the flavour!

Spire's Ratings
Flavor: 4/5
Price: 3/5
DIY level: Nonexistant
Fun: Nonexistant

Saturday, September 28, 2013

Coris Wakuwaku Doubutsu Soft Animal Candy

I wasn't entirely sure what these were at a glance, based on the packaging alone I thought these were some kind of chilled candies. But no, they're actually soft candy lollies which looks like one of those Kutsuwa eraser kits gone wrong. I got it for RM 7.70 at Isetan KLCC. Their selection has gotten very good as of late so I strongly recommend looking around there if you want to try out any of their Japanese candies.
The flavours that you're given are pretty apparent from the packaging; strawberry and lemon. And this is one of those kits where the contents are blind packed too. The wrapper shows a panda and a lion, but I got a bunny and an elephant instead.
There are four different molds you can possibly draw, with the giraffe and bear looking like the cutest.
Inside you'll get the pair of aforementioned press-molds, the soft candy and four lollipop sticks to use.

On opening the candy I was hit by some great smells. The candy is soft and the lemon smells tangy while the strawberry smelled a bit sweet but not too artificial. It was looking great so far. How it works is you have to pluck off the desired bits of soft candy and press them into different sections of the press, since both flavours go pretty well together it doesn't matter where you place them either.
When you're satisfied with the placement of things, stick the stick in the middle and press it down as far as it'll go. Pop it off and what you get? adorably cute lollies!
The candy itself is soft and easy to manipulate, though it gets sticky if you handle it for too long. You've got enough material to make 4 sticks worth but I somehow ended up with extra. The molds are a breeze to use too, nothing got stuck! which is pretty neat in itself because mold kits tend to tell you to either spray the molds with water or oil them.
Spire sez: This is definitely a fun kit that's meant to be shared. They even give a little extra candy so there's room for error. The candy is not too sweet, its just right in my opinion. Both the lemon and strawberry taste true to their flavours without artificialness, though I also find the kit requires crazy levels of manual dexterity to get candy into the tiny parts of the mold else the candies can end up looking pretty creepy with holes and stuff. Overall I think it'll be a hit with slightly  older kids.

Spire's Ratings
Flavor: 4/5
Price: 5/5
DIY level:  Easy
Fun: 3/5

Wednesday, August 21, 2013

Kracie Naru Naru Gumi Candy Kit (Soda)

Hey everyone, we're back after another (very busy) hiatus :D

Just a note, I went to Isetan KLCC recently and they've stocked up with an entire shelf full of new candy kits (price range RM 7-RM19) so here's your chance to bag yourself some!

What we have here is a very simple yet popular candy kit that allows you to make your own gummy 'grapes' in a rather unique way. I got this for RM9.90. I think it was a promo price because I've seen it being sold for RM12 elsewere before. I got it at one of those Japan snack faires. There's a grape flavour too, which I imagine would have been sweeter than the soda one.
Inside the bag you have the makings of a grape 'stem' made of plastic as well as three bags of sugary substance, namely a bag of fizzy sprinkles, a bag of the gummy powder and one more bag of powder you mix into a liquid to dip the 'stem' into.
How this works is you assemble the stem after cutting them out of the lattice (that tree shaped thing) and repeatedly dip it into the liquid, into the powder and then back into the liquid to build up the 'grapes' as you go along. It pretty much looks like this once assembled. It fits in a wee bit loose so make sure you snap it all in as tight as you can.

If you're not entirely sure how it fits together, there's some very easy to understand instructions on the back of the packet.
The kit is pretty straightforward. After you piece the stem together just pour in packet number 1 into compartment 1 and fill it up to the water line. This pack had a very strong ramune smell when I opened it up. Stir it till it dissolves and you're good to go to package 2!

Package 2 simply goes into the next compartment. It kinda looked like soap powder out of the bag, but it distinctively smelled of ramune too.
Just stick the stem in compartment one, rotate once and you're ready to start!
You just keep going back and forth between the powder and the liquid and watch as 'grapes' start to form on the stem. Our advice to get the most out of your powder is to even it out once grooves start to form so you get more even coverage.
 You'll eventually end up with this (or bigger!)
The last package has a bunch of fizzy sour lemon sprinkles in it that happilly fizz away when they hit the grapes. Personally I don't like the sprinkles all that much but they're quite nice to look at.

As far as taste goes, I was a bit surprised it didn't taste AS strong as I expected. The grapes have a gooey gummy texture of sorts and they aren't too sweet. If you made them too large they do have a tendency of randomly dropping off but generally speaking there's enough material in the packets to make almost two full stems worth of 'grapes'.


Spire sez: It was relatively fun though I probably wouldn't eat it again on pretext of not really enjoying the texture and flavour all that much.Overall this kit's end result wasn't too impressive and it can turn into a giant mess but it'll keep the kiddles entertained while you untangle the confusion about how grapes really are made :P

Spire's Ratings
Flavor: 3/5
Price: 3/5
DIY level: Easy
Fun: 4/5

Monday, May 20, 2013

Popin' Cookin' Bento Candy Kit

Hey everyone! I hope your week has been awesome because we have another  post!
This kit is one of the more popular ones, having had a lot of reviews and videos done of it over time. It's still available on the market (yay!) but the kit has had a refresher (aka a change in packaging and contents) but it hasn't had a drastic change, with the exception of it having an additional bag of sprinkles and it no longer features the chicken nuggets. This one I bought for RM16.90 at Shojikiya, and it's still priced about the same for the new kit.

The inner packaging when opened out, had a surface for you to put your ready made bento on; with an illustration of a lunch box you could arrange it all on. The sides had the usual size guides and instructions on how to make the rice balls and how to operate the noodle mix bag. If you're going to use this as a plate or display, we do stress that you should at least give it a rinse first.
Inside, there's the usual plastic mold with all the bento 'food' shapes and mixing compartments. You get a little plastic fork as well and the dreaded plastic bag, on top of the six bags of mix that will create the goodies within.
Just pour the appropriate powders into each compartment and add the necessary amount of water as indicated by the instructions, then stir it with the fork. The liquid has quite the tendency to overflow so if you're a stickler for perfection I suppose you could mix it elsewhere and pour it into the mold instead. The octopus sausage mold made the most spectacular mess when we were getting it done because the tentacles were rather shallow.
While waiting for it all to solidify, we started on the other components.

The rice as expected was quite nice and fluffy when we mixed it up. It's important to follow the instructions when it comes to the water for this one; even the slightest extra will cause it to be goopy and very un-ricelike but too little will make it fail to congeal.
That done, we used the instructions on the inner packaging to make our panda riceballs and onigiri! After shaping it all, we pressed the larger riceball into the black powder molds to create a cute panda face, pressing the triangle in to make an onigiri and rolling the other two smaller balls to make the panda's 'ears'.

The powder was a little sour but had a bit of fizz to it. We ended up licking our fingers a lot! It stuck to the rice very well but there's was a lot leftover too. After that I just mixed up the chicken nuggets powder. It started off a bit gooey like the rice mix but congealed together in the end. 
Once done, we molded the chicken nuggets. They're a little more dense than the rice mix but they sure looked good. Separate the mix into two nuggets and press it each side with the fork to give it the 'katsu' look and you're good!
Next up was the pasta. Not to be defeated by the 'noodle goo' once again, we poured it right into the bag and mixed it there. Just make sure that there aren't any lumps and you're done.That said, simply nip off a corner of the bag and squeeze out the mix to make the 'spaghetti'. You can control how thick you want your pasta too, but thicker is better in this case.

By then the broccoli, egg roll and sausage had solidified nicely. They were all a little jiggly (it's jelly after all!) but weren't hard to remove from their molds. We then folded up the egg roll and it glued itself together easily before placing it all onto the plate.
I neglected to dry the plate before taking photos, so it's a little wet because the gummies had a little bit of dripping liquid when we took them out. I suppose if you left them in longer, they'd be a lot more dry unlike what you see here.

On to the tasting!

The spaghetti had a yogurty-starchy taste. It wasn't bad but at the same time not entirely flavourful either.

The egg roll tasted like grape. A bit strange coming from something yellow in colour but its likely it's white grape (muscat) flavour.

The rice tasted very plain but the slightly fizzy and sourish powder gave it a bit of a tingly kick. Otherwise the rice was just really fluffy and starchy.

I liked the chicken nugget thing a lot! I can't entirely remember what it tasted like but it was kinda yogurty I suppose.

The broccoli also tasted like grape(muscat) and the octopus sausage like strawberry. It's meant to be one of those really sweet kits so nothing here is actually savoury.

Spire sez: Well overall I'd say the kit was quite fun but I wasn't too big a fan of the flavours.. I felt they weren't strong enough and their choices of flavours were a bit out there (but a standard for Japanese candies) perhaps I am more biased towards the Happy Kitchen sets that actually put in more solid ingredients but I suppose that's just me.

If you like making a big mess and like eating the sweet aftermath, I say this kit is one of the 'must try' DIY items.

You could also probably wash out the mold and keep it for future projects using Jello I wager.


Spire's Ratings
Flavor: 4/5
Price: 3/5
DIY level: Easy
Fun: 3/5

Saturday, April 13, 2013

Popin' Cookin' Oekaki Gummy Land

Hey guys, we're back with another sweet review (pun intended!)

This set was gotten from Tokutokuya for RM 13.90. You can get it in some other places as well but I haven't seen any besides there.
Generally what you do with this set is you make your own flavoured candy gummies with the provided materials in box; which consists of a bunch of cookie cutter shapes that varies from pack to pack, there's no way of telling exactly what's inside, a few sachets of gummy powder and flavourings as well as a 'pallet' of sorts where you make your creations.
You pretty much achieve this by using the included dropper to 'colour' the shapes with the flavoured water. There's some instructions in the front on what colours end up tasting like what flavours, but its still totally up to you whether you want to follow it or not. 
Even if you can't read Japanese they make it really easy to understand what sorts of flavours you get when you mix the colours. You can apparently make diluted versions of each colour as well, by adding a higher water ratio in the pallet; but I find that it dilutes the flavours a little too much to my liking.
Inside, you get the usual bundle of sachets, a plastic pallet, cookie cutter shapes and a dropper.
Its a shame that its not too easy to see what shapes you will get inside. I think I landed with one of the more generic-shapes ones. I was hoping that there would actually be a dolphin shape inside (as indicated by the packaging) but I guess this will have to do. The plastic is fairly tough, so once you're done you can keep them as cookie cutters or stuff to make those cute bento box decorations.
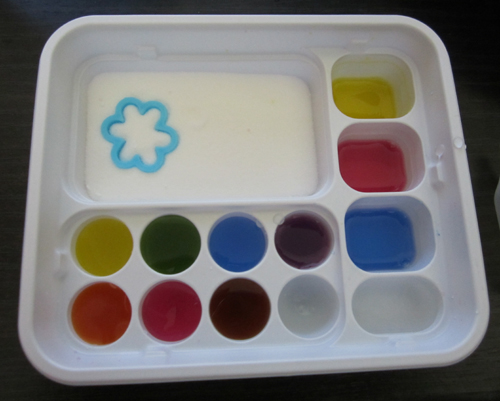
All laid out, you pour in the whole packet of sweet smelling gummy powder into the largest section of the pallet, and fill up the appropriate colours. Each reservoir has a water level indicator so you likely won't overfill it by accident. Yellow is lemon flavoured, red is grape flavoured and blue is ramune/soda flavoured. Of the three primary colours I liked the yellow the most; it tasted strong without being ridiculous, which is a good thing!
I decided to go with one of the smaller shapes first, and followed the instructions to get the appropriate colours; except for the brown (a mix of all three primary colours) which kinda tasted like a watered down cola. You have to shove the shape all the way down till the powder is almost overflowing out of it before you get to work.
Colouring up the shapes is pretty easy; you grab the dropper and drip in the colours you want to 'paint' the gummy with.
Once the colour is in, it's sucked up by the powder so even if you put more on the same spot it doesn't mix, so you can get creative without worrying that it'll turn into an ugly mess. Pretty neat!
After that you give the gummy a short while to dry and you can just pick it out of the mold using the included fork. The back of the gummy will be coated in a little bit of white powder where the liquid didn't get through and will be a bit lumpy. You can take care of it with a quick squirt of extra colour before you put it aside.Then use the fork to even out the powder again before you make a new gummy.
Now the biggest problem I have with the kit here is overflow. When you start getting near the bottom of the powder, the gummy tends to either get stuck to the bottom of the pallet or extra colour starts coming out the sides.

The kit is maybe good for maybe four gummies before it hits this stage, depending on which shapes you used. In the end there was a little powder left over which I couldn't do much with so I squirted it with some colour and let it solidify there. A gummy's a gummy.
Personally I found this kit quite enjoyable. For starters the colours are nice and vibrant; and the flavours are quite pleasant as well. They weren't horribly sweet and neither were they too strong.

The only flavour I didn't really like was the Ramune, but that's mainly because I don't like Japanese Soda flavour to begin with. The rest tasted quite strong, with my favourites being lime and orange.

The gummies themselves weren't as tough as the ones you can get at the store, but instead were slightly soft, but they held their shapes well and frankly they were delicious.

Spire sez: Honestly speaking, this would be one of the kits I would love to play around with again. Its fun for kids who are creative, and it's real colourful so it satisfies the need to learn-and-play. The gummies are pretty tasty too; I just wish they gave more of the gummy powder; I'd gladly pay extra if they provided maybe two sachets instead of just one. On top of that the pallet can be kept for real watercolour works and the shapes can be kept as well, I say this kit deserves it's high ratings.

Silvy says: It was a fun and entertaining kit! My only peeve would be that the instructions were pretty vague (if you didn't search it up on Youtube that is) and the gummies didn't dry up fast enough for me to remove them from the molds! Oddly hypnotizing and relaxing to work this out, have a great time with your friends (and get sugar high right after that!)

Spire's Ratings
Flavor: 4/5
Price: 3/5
DIY level: Easy
Fun:  5/5

Silvy's Ratings
Flavor: 5/5
Price: 3/5
DIY level: Easy to Average

Fun:  5/5

Saturday, March 23, 2013

Puchi Deco Tezukuri

Hey gang, we're back with something a little different, a deco candy post!

For the life of me I cannot read Japanese, and I can't seem to find the actual name of this kit either save for what the English ingredient label said at the back. But what IS obvious about this kit is that it gives you a bunch of pre-moulded chocolate treats to decorate and either eat (of course!) or give to your friends.It was priced at RM 24 when purchased.

This kit and the others in the same series have the girliest boxes I've ever seen in my life; they're completely pink for one, and if the lace and sparkley gem prints don't give away that this is for girls well....perhaps it's time to get your eyes checked. Please ignore the expiry date, we tend to write our reviews at random after we actually test out the kits so we're not actually messing around with expired candy here.


The kit itself didn't really have that much in it, consisting of the moulded chocolate cakes and cake slices, a sachet full of sugar decorations, a tube of white chocolate and a bunch of rather cute packets to store your candy in once you were done.
Here's a closeup of the chocolates themselves. Each one was a milk chocolate with a layer of white chocolate on top. They looked pretty plasticky to the point they almost looked like toys but they smelled pretty good.
The next order of business was to heat up the tube of white chocolate. This would act as the 'glue' for all the sugar decorations which consisted of candy shapes (flowers and hearts of various colours) and colourful nonpareils. Since the chocolates came in some extra packaging we just reused them as a place to store the candies while we worked.
Now here came the hard part. The kit doesn't give you anything to help you decorate your goodies, so we resorted to using toothpicks to help attach the candies, which is really tricky. You see, both Silvy and I have these giant ungainly hands that aren't capable of handling the delicate task of decorating such tiny things, but we tried our best anyway.

First you attach a glob of white chocolate and then stick on a nonpareil or a candy onto it. Sounds simple doesn't it?

Considering how LONG both of us took to decorate six candies, we had to reheat the tube of chocolate at least 3 times with fresh bowls of hot water. This is what happens when you give a pair of adults with questionable decorating skills something like this.

We did have a lot of fun decorating these candies of course, and when bagged up with the included plastic bags they did look pretty adorable. 
We didn't bundle up everything however, for what's the point of candy if none are sacrificed for the sake of taste. So like all good supporters of natural selection; we ate the ugly ones. These are pretty cute things to give people as gifts honestly, but it also makes a fantastic passive aggressive gift to those who lack the coordination for tiny things.

Spire sez: Despite being plastically in looks, honestly they were pretty delicious. You do feel a bit bad chomping down on something you so meticulously made but the fun involved in making them is worth the effort. You also end up with a lot extra white chocolate left over and that itself doesn't taste half as bad either. My biggest gripe would be the price, which is a bit ridiculous for the amount of stuff you get inside. I would have expected somewhat better chocolate quality at least coming from something at this price point and the fact that the box advertises pink coloured chocolate pieces which were nowhere to be found.

Silvy says: I loved it! It was fun attempting to test out my artistic skills piping the melted chocolate nicely on the 'cakes' and decorating them painstakingly one bead/flower at a time. Taste-wise wasn't all too bad either, despite the initial impression that the 'cakes' looked rather plasticky and inedible. I just wish we could've 'baked' the cakes instead of getting pre-set ones. 

Spire's Ratings
Flavor: 4/5
Price: 3/5
DIY level: Moderate-Hard
Fun:  4/5

Silvy's Ratings
Flavor: 3/5
Price: 3/5
DIY level: Moderate-Hard (precision is needed!)
Fun:  5/5